
I’m offering the laser and slide for free to anyone who wants to do a DIY trim check. I just ask a $100 deposit to make sure I get the stuff back. Pickup is in Richmond or possibly on launch if we can manage coordinating it. PM me. I offer no warranties or promises, zero liability. I am not responsible for the accuracy of any of the info posted here. Anything you do is at your own risk!
Line Plan
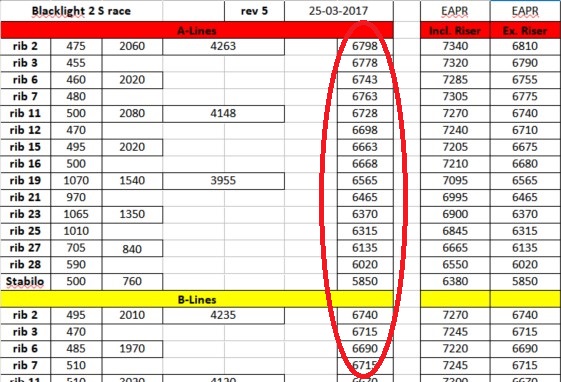
Your wing manufacturer will provide you a line plan, either on their website or by request. Make sure the line plan is for the exact wing model. If you have any doubt, confirm with the manufacturer by sending your serial number and asking for the correct line plan. The line plan for my wing looks like this. There is a lot of info here but the thing we are interested in is the total length including all galleries. Note: The EAPR (naming varies by manufacturer) is the “certification sample” tested length. I prefer to use the factory specified length.
Setup
Clamp the sled to a table with a clear area in front at least 8 meters long. I use a waist high table and hold the laser at a consistent waist height. It should be as close to level as possible. Layout your wing with the leading edge toward the sled.
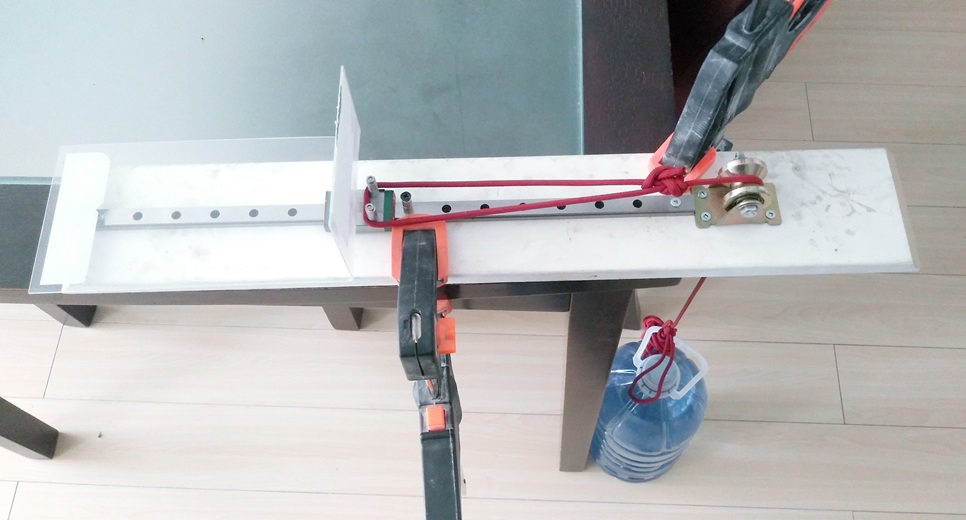
Hook on a 3-5kg weight to the line on the sled. The exact weight doesn’t seem to be critical as long as it is consistent. I've used a 10lb(4.5kg) dumbbell and it works well. A milk jug or 4L water jug also works well, coming in at about 4kg. The weight rope length should be set so the weight hits the floor before the sled hits the end stop. This is gentler on the lines as if you constantly hit the hard end stop, it can transmit a lot of shock into the lines.

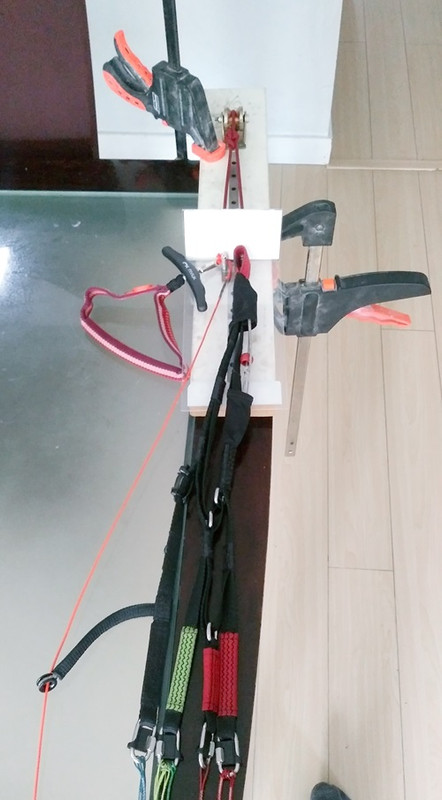
Hook one riser and brake to the two pegs on the sled. Ensure the line being measured is free and untangled.
Measuring
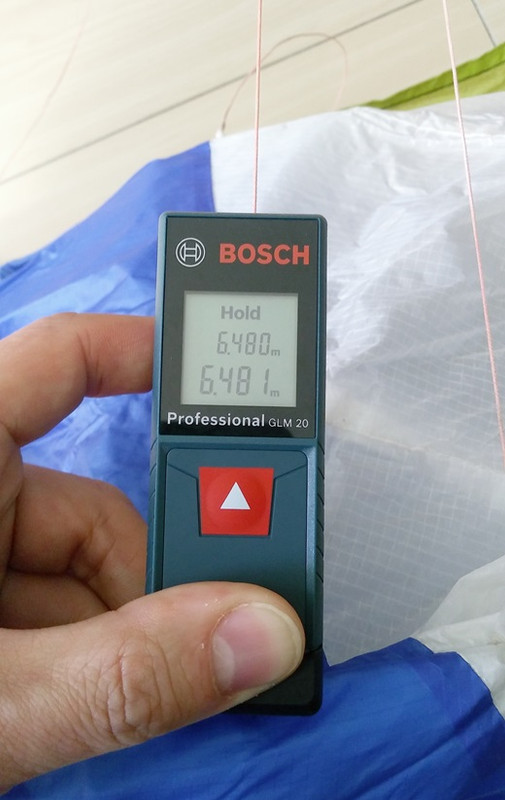
I hold the laser rear edge to the line loop seam.
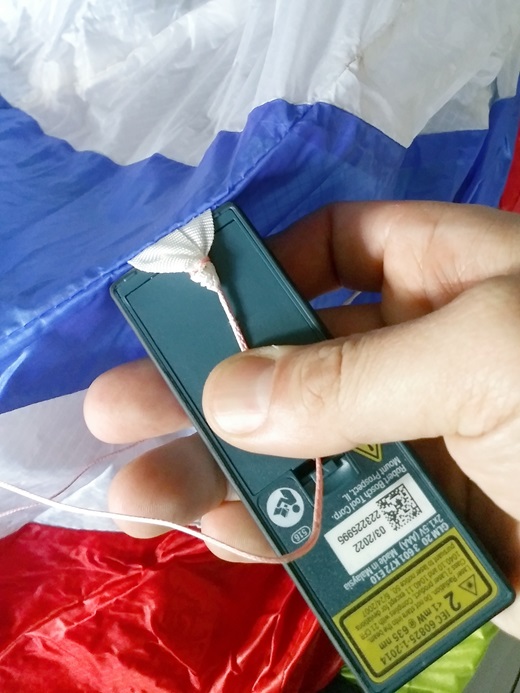
Remember, it’s about consistency. There is no rule for how to hold it, as long as you do it the same way every measurement. Pull back to tension the line until the weight is completely off the ground. Press the red button and point it at the sled target. When stable, press the red button to hold the measurement. The unit automatically adds the length of the device. Press the red button again to move the hold measurement to the top line on the display and the bottom line will show the live measurement. If the two are reasonably close, write it down in the spreadsheet.
The Spreadsheet
I created this spreadsheet with my own needs in mind. It’s pretty simple with only the things you need to get a good trim. You can find samples on the internet of very complex spreadsheets with crazy graphs and calculations. Use whatever works for you.
https://drive.google.com/file/d/1sHOgRa ... sp=sharing
All cells that you aren’t supposed to change are protected. If you want to make changes, use a blank password to unprotect the sheet. Obviously you’ll have to unprotect to enter your “Spec” line lengths and you will probably need to edit the spreadsheet to account for differences in your line layout. Protect the sheet again to avoid changing cells that shouldn't be changed while entering data. I can help you out with this if you don’t know Excel.
The first value to enter is the “Riser” length in mm. This can usually be found on the line plan but should also be verified with a ruler.
Second is “Offset”. An important concept to understand is that we are not looking to adjust the lines to their exact factory length. Instead we are trying to make the “relative” length of all the lines the same as factor spec. That means that the lines can be shorter (or longer) than spec, as long as they are all shorter (or longer) by the same amount. The “Offset” value lets us add this constant difference and have the spreadsheet do the math. General guideline floating around the internet is that if your offset ends up greater than +/-50mm, you should consider a new lineset.
Third you would enter the “Spec” values from your line plan for the factory specified line length. The spreadsheet automatically add the riser length and will give you the total in the “+Riser” column.
Fourth, take your measurements and enter into the “Meas” column. The spreadsheet calculates the difference and assigns a red or green status if the value is outside +/-10mm. Anything showing red is outside of accepted tolerance and should be adjusted. Positive values are long and negative values are short.
The “Trim” column just shows the type of line adjustment loop type currently present and is for your info only. It does not affect calculations.
A typical first trim will look something like this:
- Enter the “Riser” length in mm.
- Enter the “Spec” values from the line plan.
- Measure and record all the lines to the “Meas” column.
- Typically your A's are under the most tension and are going to stretch (or shrink the least). A lot of manufacturers will put a double loop or larks foot on the C's maillons so that you can balance it out. Release any loops on the C/D riser maillons.
- Measure and record C/D lines to the “Meas” column.
- Enter in an “Offset” value that brings the C/D “Delta” to a green state. With as many values close to zero as possible.
- At this point your Cs and Ds should all be green and As and Bs should be red with values are all positive indicating the lines are long.
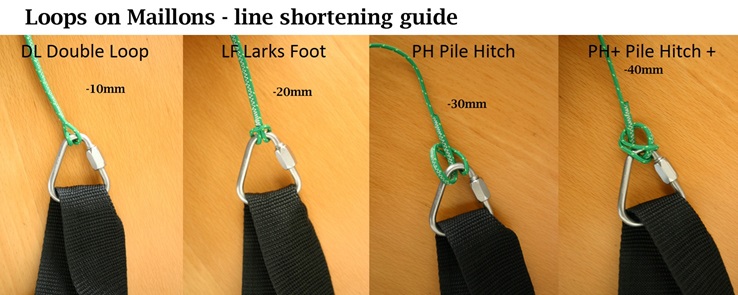
- Add a loop at the maillon to shorten one of the the lines that is long. Remeasure. Repeat.
- At the end, I suggest doing a full remeasurement of the entire wing to make sure you haven’t messed up... it is really easy to mess up.

The above process is simplified and contextual but you get the logic... Bring everything to a baseline with as much green as possible with as few loops as possible. Ensure that any remaining reds are positive numbers so they can be adjusted by adding loops to shorten the lines. Any negative red numbers must already have an existing loop that can be released to lengthen the line. Also, if any one line requires more than 40mm (PH+) adjustment, you should replace the line.
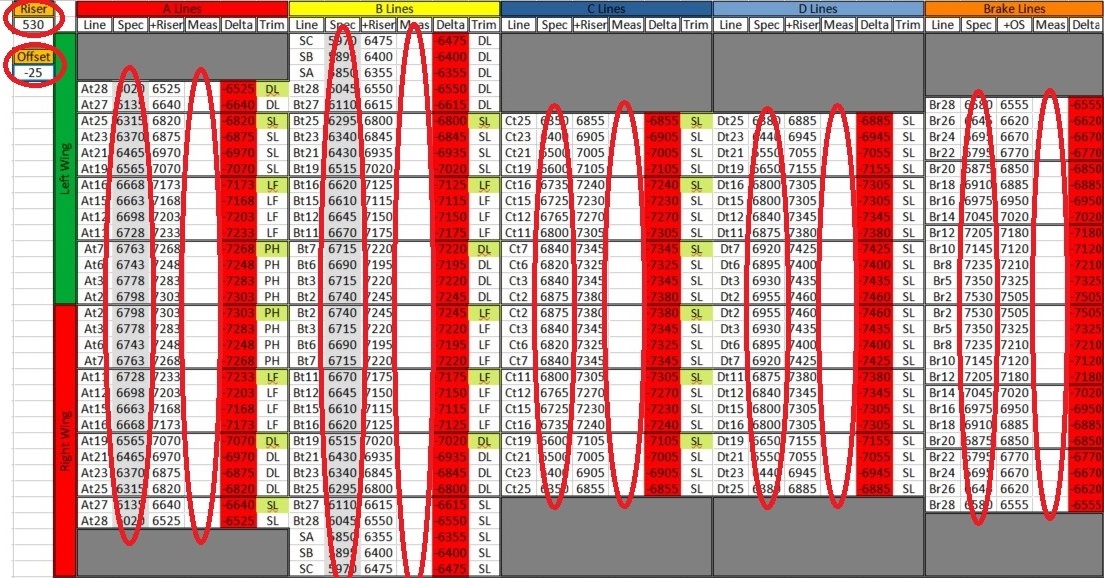
This shows my measurements after 50 hours with a factory trim.

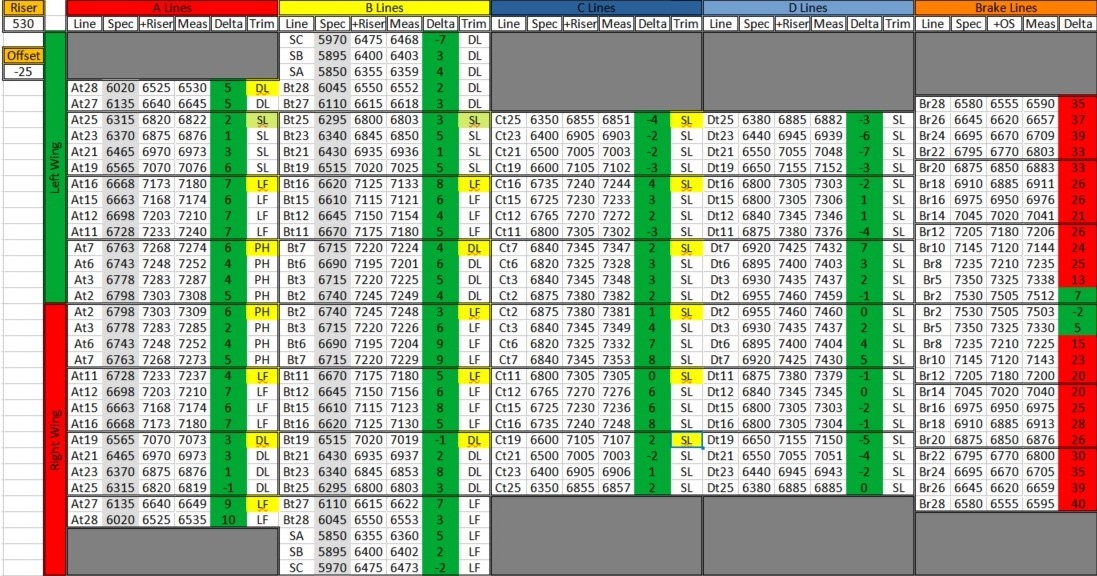
This shows my measurements after trimming using this process and a -25mm offset.
Test It
Don’t just take your freshly trimmed glider on an epic xc flight. Kite it first, does it behave normally? Take advantage of a day when the shuttle is running laps and do an early day sledder. Get away from the hill and do a series of dolphins to make sure there are no strange frontal tendencies. If your comfortable, pull a small frontal. Did the tension feel heavy enough? Test pulling ears and pushing speedbar.
As with everything in this sport, your life depends on your gear being setup properly. If any of this did not make sense, I highly suggest taking your wing to a professional that offers laser trimming. I’m not sure if there is anyone local that does this. Post below if you know.
Further Reading
Here are some links to further reading. I am by no means an expert in this. Quite the noob actually. Don't just take my word.
https://www.nova.eu/en/news-stories/art ... g-feeling/
https://aupgsquad.blogspot.com/2016/02/ ... mming.html
https://adnubes.info/en/check-paraglider-trim/
https://www.youtube.com/watch?v=9U7zSrvCm1g
https://www.youtube.com/watch?v=9Gd_DVSFMJw&t=7s
https://www.youtube.com/watch?v=CpzseOFLY10
https://www.paraglidingforum.com/viewtopic.php?t=54357